Home Studio: How To Record Bass Guitar 🔊
Capture the Bass Twice
“Get it right at the source.”
Bass guitar looks simple to record.
Plug it in.
Press record.
Done.
And sometimes...
That is exactly what you should do.
But one of the most flexible bass recording techniques combines two different perspectives:
DI for control.
Amplifier for character.
The DI gives you a clean, direct version of the instrument.
The microphone captures the amp, speaker, and room.
Blend them together...
And you can get the precision of a modern recording with the personality of a classic bass rig.
Quick Answer
👉 The simplest way to record bass guitar is to connect it directly to an instrument input on your audio interface. If your interface does not have an instrument or Hi-Z input, use a DI box. For more character, record a bass amplifier at the same time with a microphone. Capture the DI and amp to separate tracks, then check their polarity and phase so the low frequencies reinforce instead of cancel each other.
🎛️ Method 1: Record Bass Direct
The simplest bass recording chain is:
Bass → Audio Interface → DAW
Look at your interface.
Does it have an input labelled:
- Instrument
- INST
- Hi-Z
- Guitar
If yes...
You probably do not need a separate DI box.
Set the input to instrument mode and plug your bass directly into it.
Recording: What Is a DI Box and When Do I Need One? 🎛️
🎚️ Why Use an Instrument Input?
A bass guitar produces a different type of electrical signal than a microphone.
The instrument input is designed to receive that signal correctly.
Plugging a bass into an ordinary line input may result in a sound that feels:
- Dull
- Weak
- Thin
- Lacking detail
The Hi-Z instrument input provides the proper impedance for the instrument.
If your interface already has a good instrument input, the DI box is optional.
📦 What Is a DI Box?
DI traditionally means Direct Injection or Direct Input.
A DI box converts the bass signal into a format that works well with microphone preamps, mixers, and long balanced cables.
A typical setup becomes:
Bass → DI Box → Microphone Input
Many DI boxes also have a Thru output.
That allows you to send the same bass to an amplifier.
So you can record:
DI + Amplifier
at the same time.
🔀 A Classic Two-Signal Bass Setup
Connect the bass to the DI.
Then split the signal.
Signal 1
DI → Interface → DAW
Signal 2
DI Thru → Bass Amp → Microphone → Interface → DAW
Now you have two bass tracks.
One clean.
One coloured.
The DI captures the bass.
The microphone captures the bass rig.
⚡ Active vs Passive DI Boxes
DI boxes generally come in two forms:
- Passive
- Active
Neither is automatically better.
They simply behave differently.
🔋 Active DI
An active DI contains powered electronics.
It may receive power from:
- Phantom power
- Battery
- External power supply
Active DIs usually have very high input impedance.
That makes them useful for instruments with passive pickups.
Active DI Works Well With
- Passive basses
- Passive guitars
- Piezo pickups
- Lower-output instruments
A passive Fender-style bass into a quality active DI is a classic combination.
🧲 Passive DI
A passive DI generally uses a transformer and does not require power.
They are simple.
Reliable.
And often excellent sounding.
Passive DI boxes can work particularly well with:
- Active basses
- Keyboards
- Electronic instruments
- Stronger output signals
The Simple Rule
Passive instrument?
Try an active DI.
Active instrument?
A passive DI often works beautifully.
But this is not a law.
Listen.
The better sounding combination wins.
🎛️ Do I Need a DI Box If I Own an Audio Interface?
Maybe not.
If your interface includes a good Hi-Z instrument input, you already have a way to record the bass directly.
You might still use an external DI because you prefer:
- Its transformer sound
- Its headroom
- Its signal splitting
- Its ground-lift function
- Its workflow
But you do not need to buy one just because someone told you that bass must be recorded through a DI.
🔊 Method 2: Record a Bass Amplifier
A DI gives you clean bass.
An amplifier gives you character.
The amplifier changes the sound through:
- Preamp circuitry
- EQ
- Tubes or transistors
- Power amplifier
- Speaker
- Cabinet
- Microphone
Each stage leaves a fingerprint.
📻 Combo Amp vs Amp & Cabinet
Bass amplifiers generally come in two physical configurations.
Combo Amplifier
A combo contains:
Amplifier + Speaker Cabinet
inside one enclosure.
Plug in the bass.
Turn it on.
Everything is ready.
Combo amps are:
- Simple
- Compact
- Convenient
- Excellent for home studios
Separate Head and Cabinet
A traditional bass stack separates the amplifier and speaker cabinet.
You have:
Bass → Amplifier Head → Speaker Cabinet
This gives you more flexibility.
You can combine different:
- Amplifier heads
- Cabinets
- Speaker sizes
- Power ratings
This approach is common in larger studios and live rigs.
A combo is one complete system.
A head and cabinet let you build the system yourself.
🏛️ Two Classic Bass Amplifiers
If you want to understand traditional recorded bass tone, two Ampeg designs are essential.
🔥 Ampeg SVT
The Ampeg SVT arrived around the end of the 1960s and became one of the defining bass amplifiers of rock music.
SVT stands for:
Super Vacuum Tube
It is famous for:
- Huge power
- Tube saturation
- Thick low mids
- Aggressive presence
- Enormous rock bass tone
The classic SVT rig is associated with the enormous 8x10 speaker cabinet.
Eight ten-inch speakers.
A wall of bass.
Great For
- Rock
- Punk
- Alternative
- Hard rock
- Heavy music
If you imagine a loud bass amp pushing behind a rock band...
There is a good chance the sound in your head resembles an SVT.
🔊 Ampeg Portaflex B-15
Before the SVT...
There was the Ampeg B-15 Portaflex.
Introduced in the 1960s, the B-15 became one of the classic studio bass amplifiers.
Its design allowed the amplifier section to flip into the cabinet for transportation.
Hence:
Portaflex.
But engineers remember it for the sound.
The B-15 Sound
- Warm
- Round
- Smooth
- Controlled
- Rich
- Musical
It became particularly associated with:
- Motown
- Soul
- R&B
- Jazz
- Vintage pop
James Jamerson's legendary Motown bass sound is strongly associated with the Ampeg B-15.
The SVT sounds like the stage.
The B-15 sounds like the studio.
🎤 Choosing a Microphone
Once the amp sounds good in the room...
You need to capture it.
The microphone becomes another tone control.
Two broad categories work especially well:
- Dynamic microphones
- Condenser microphones
🎙️ Dynamic Microphone — Darker and Controlled
Dynamic microphones tend to work very well on bass cabinets.
They can handle high sound-pressure levels and often have a slightly smoother top end.
This can produce a sound that feels:
- Thick
- Focused
- Darker
- Punchy
- Controlled
Popular examples include:
- Electro-Voice RE20
- Shure SM7B
- Sennheiser MD 421
- AKG D112
- Shure Beta 52A
Although some were designed or marketed around kick drum or broadcast use, they can all produce useful bass cabinet tones.
✨ Condenser Microphone — Brighter and More Detailed
A condenser microphone generally captures more:
- High-frequency detail
- Transients
- Speaker texture
- Room information
This can create a bass sound that feels:
- Brighter
- More open
- More detailed
- More natural
Condenser microphones can also capture more of everything you do not want.
Including:
- Room reflections
- Computer fans
- HVAC
- String noise
That can be either useful...
Or annoying.
Simple Starting Point
Want darker and tighter?
Try a dynamic microphone.
Want brighter and more detailed?
Try a condenser microphone.
10 Universal Rules for Recording Anything with a Microphone 🎤
🎯 Microphone Position Across the Speaker
Where you point the microphone dramatically changes the sound.
Imagine looking directly at the speaker cone.
You have two main areas:
- Center
- Edge
🎯 Center of the Speaker
Point the microphone toward the center of the speaker.
This usually produces more:
- Definition
- Attack
- Presence
- Upper-frequency information
It is an excellent normal starting position.
Place the microphone close to the grille...
Aim toward the center...
Record.
Listen.
🌑 Move Off-Center for a Darker Sound
Move the microphone toward the outside edge of the speaker.
The tone generally becomes:
- Darker
- Rounder
- Softer
- Less aggressive
The microphone has not changed.
The amplifier has not changed.
Only its position changed.
Center is brighter.
Edge is darker.
That is one of the easiest tone controls in recording.
📏 Microphone Distance
Distance creates another dimension.
Start close.
Then move backward.
🔎 Close Microphone
A microphone close to the speaker produces:
- Strong presence
- Good isolation
- Less room
- More direct speaker sound
- Greater control
This is usually the safest starting point for home recording.
🌊 Move the Microphone Back
As you move farther away, the microphone hears more of:
- The complete cabinet
- Low-frequency development
- Room reflections
- Acoustic space
The sound may become:
- Bigger
- Deeper
- Less present
- More natural
- More ambient
But the room becomes increasingly important.
Close sounds like the speaker.
Farther away sounds more like the amp in the room.
From Dull to Harsh: How to Choose the Best Microphone for Any Voice or Instrument 🎙️
 ⭐️ Download my Free Music Production Guides or take my free Ableton Live Course ⭐️
🏠 Room Sound
Moving the microphone farther from the cabinet can increase the sense of low end.
But it also increases the room sound.
In a great room...
That may be exactly what you want.
In an untreated bedroom...
Maybe not.
If the room sounds bad...
Move closer.
Capture the amplifier first.
Add space later.
🔄 Recording DI and Amp Together
This is where bass recording becomes especially powerful.
Record:
Track 1
Clean DI
Track 2
Microphone on the amplifier
The DI provides:
- Attack
- Definition
- Clean low end
- Editing flexibility
The amp provides:
- Saturation
- Speaker character
- Midrange personality
- Depth
Blend them.
⚠️ But There Is a Potential Problem: Phase
The DI signal enters the interface almost instantly.
The microphone signal takes a little longer.
Why?
Because the bass leaves the speaker...
Travels through the air...
Then reaches the microphone.
That creates a tiny timing difference.
A few milliseconds may not seem important.
At low frequencies...
It can completely change the sound.
🌊 Think About the Waveforms
Imagine the DI waveform goes upward.
At the same moment...
The microphone waveform also goes upward.
They reinforce each other.
Now imagine:
The DI goes upward.
But the microphone goes downward.
They begin cancelling.
The result may sound:
- Thin
- Weak
- Hollow
- Missing low end
You want the DI and microphone waves moving together as much as possible.
🔁 Polarity vs Phase
These terms are often used interchangeably...
But technically they are different.
Polarity
Flips the entire waveform upside down.
Positive becomes negative.
Negative becomes positive.
This is what the Ø polarity button does.
Phase
Describes the timing relationship between two waves.
Changing the microphone distance changes phase because it changes how long the sound takes to reach the microphone.
Polarity flips the wave.
Distance moves the wave in time.
Both can change how the DI and microphone combine.
🎧 The Polarity Test
Record the DI and amp together.
Play both tracks.
Listen carefully to the low end.
Then press the polarity invert button on one signal.
Choose the position with:
More bass.
That's the simple test.
If one polarity setting sounds:
- Bigger
- Deeper
- More solid
Use it.
If the other sounds:
- Thin
- Hollow
- Weak
Don't.
The polarity setting with the most low end usually wins.
📏 Fix Phase With Microphone Distance
Polarity can solve a major inversion...
But you can improve the relationship even more by moving the microphone.
Try moving it:
- Slightly closer
- Slightly farther away
Record again.
Listen.
You are changing the arrival time of the amplifier signal.
The goal is to find the location where the DI and microphone reinforce each other naturally.
This is better than automatically fixing everything later.
💻 Aligning the Tracks in Your DAW
Even after careful microphone placement...
You may want to inspect the recordings inside your DAW.
Zoom into a clear transient.
Compare the DI waveform to the amplifier waveform.
You may see that the microphone recording begins slightly later.
You can experiment with moving the microphone track earlier.
But be careful.
Perfect visual alignment does not always produce the best sound.
Why?
Because the amplifier, speaker, room, and microphone all change the waveform.
Use your eyes to understand the timing.
Use your ears to choose the alignment.
🎧 The Phase Test
Whether you are:
- Moving the microphone
- Flipping polarity
- Sliding the track
- Using a phase alignment plugin
The final test is simple.
Listen to the low end.
Switch between options.
Whichever version gives you the strongest, most natural bass foundation usually has the better phase relationship.
More low end wins.
Not louder mids.
Not prettier waveforms.
Not a perfect-looking grid.
Bass.
🎚️ How Much DI vs Amp?
There is no correct ratio.
Try thinking about their jobs.
More DI
Creates:
- Cleaner bass
- More attack
- More precision
- Modern definition
Great for:
- Pop
- Metal
- Modern rock
- Funk
- Dense arrangements
More Amplifier
Creates:
- More character
- More saturation
- More speaker tone
- More vintage personality
Great for:
- Rock
- Soul
- Blues
- Indie
- Vintage productions
🎵 Let the Genre Choose the Technique
Different styles may need different bass recording strategies.
Pop
Try:
Strong DI + controlled amp
You want:
- Consistency
- Low-end definition
- Mix flexibility
Rock
Try:
DI + Ampeg SVT-style amplifier
Let the amp provide aggression and personality.
Soul and Motown
Try:
DI or bass + B-15-style amplifier
Aim for:
- Warmth
- Roundness
- Controlled highs
Metal
A strong DI is extremely useful.
It gives you:
- Editing precision
- Re-amping options
- Distortion flexibility
- Clean low-frequency information
Then blend the distorted amplifier or amp simulation around it.
Jazz
The DI may provide all the definition you need.
Or a warm amp captured naturally may feel more appropriate.
Avoid processing simply because you can.
🧰 A Simple Home Studio Bass Setup
You do not need a huge studio.
Try:
Bass
↓
DI or Interface Instrument Input
↓
DAW
Then optionally split the signal to:
Bass Amp
↓
Dynamic Microphone
↓
Interface
↓
Second DAW Track
Now you have:
Clean + Character
That is an extremely powerful place to start.
🧠 FAQ: Recording Bass Guitar at Home
Do I need a DI box to record bass guitar?
No. If your audio interface has a dedicated instrument or Hi-Z input, you can plug the bass directly into it.
Why would I use a DI box anyway?
A DI can provide signal splitting, transformer coloration, balanced output, ground-lift options, and a convenient connection to microphone preamps.
Should I use an active or passive DI?
Active DIs are often a good match for passive basses. Passive DIs often work well with active basses or other strong output sources. Always choose by listening.
Should I record bass DI and amplifier at the same time?
If possible, yes. The DI provides a clean safety track while the amplifier provides character.
What microphone should I use on a bass amp?
Dynamic microphones are a common choice for a thick, controlled tone. Condenser microphones can provide more brightness, detail, and room sound.
Where should I place the microphone?
Start close to the speaker and aimed near the center of the cone. Move it toward the edge for a darker sound.
What happens when I move the microphone farther away?
You generally capture less direct presence and more of the complete cabinet, low-frequency development, and room.
Why do my DI and amp sound thin together?
They may have a poor polarity or phase relationship. Try reversing polarity on one signal and adjusting the microphone distance.
How do I know which polarity setting is correct?
Listen to both settings. The one with the stronger, fuller low end usually wins.
Should I manually align the DI and microphone tracks?
You can experiment with it, but use your ears. Perfect visual alignment does not necessarily produce the best musical result.
🔑 Final Thought
Recording bass guitar does not need to be complicated.
Start with the cleanest path.
Bass.
Instrument input.
DAW.
Then add character when you need it.
A DI gives you control.
An amplifier gives you personality.
A microphone determines which part of that personality you capture.
And phase determines whether those sounds work together...
Or fight each other.
DI for control.
Amp for character.
Phase for power.
Get those three things right...
And you already have the foundation of a great bass recording.
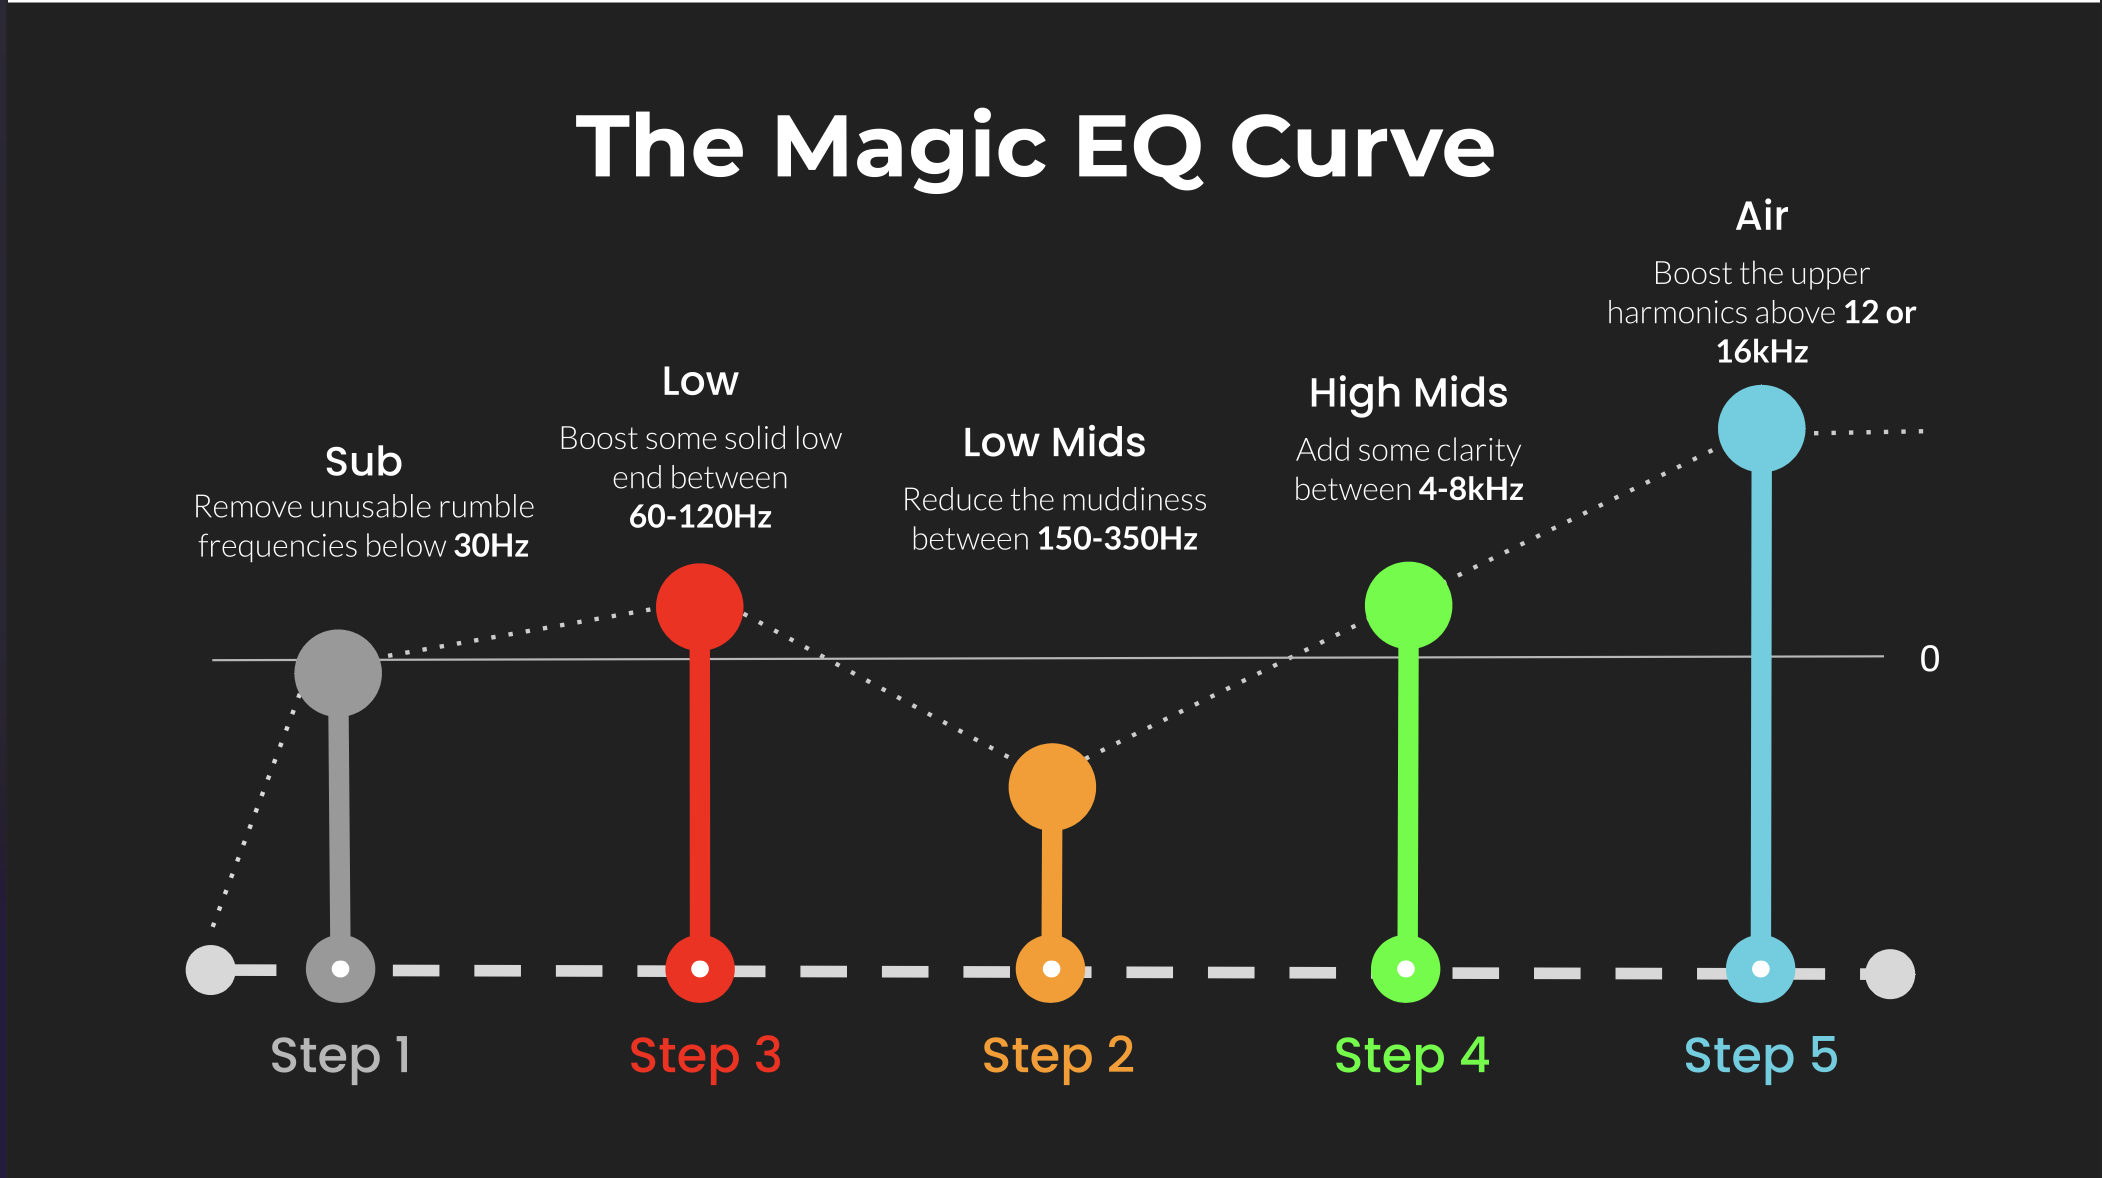 ⭐️ Download my Free Magic EQ settings Guide ⭐️

⭐️ Download my Free Magic Reverb settings Guide ⭐️
#protools #daw #homestudio #recordingschool #recording #musicproduction
Also read:
How to Start Your Own Online Business Teaching Music

Hey, I'm Futch - Music Production Coach and Ableton Certified Trainer

Learn how to make your first song and beat in Ableton Live with my
FREE 90-minute Ableton Live course
I've been teaching audio engineering and music production for 35 years.⭐️
Check out my new online music production program: Music Production Ninja...