
10 Universal Rules for Recording Anything with a Microphone 🎤

The Art of Moving a Mic
Every great recording starts long before plugins, EQ curves, or mixing tricks.
It starts with where you put the microphone.
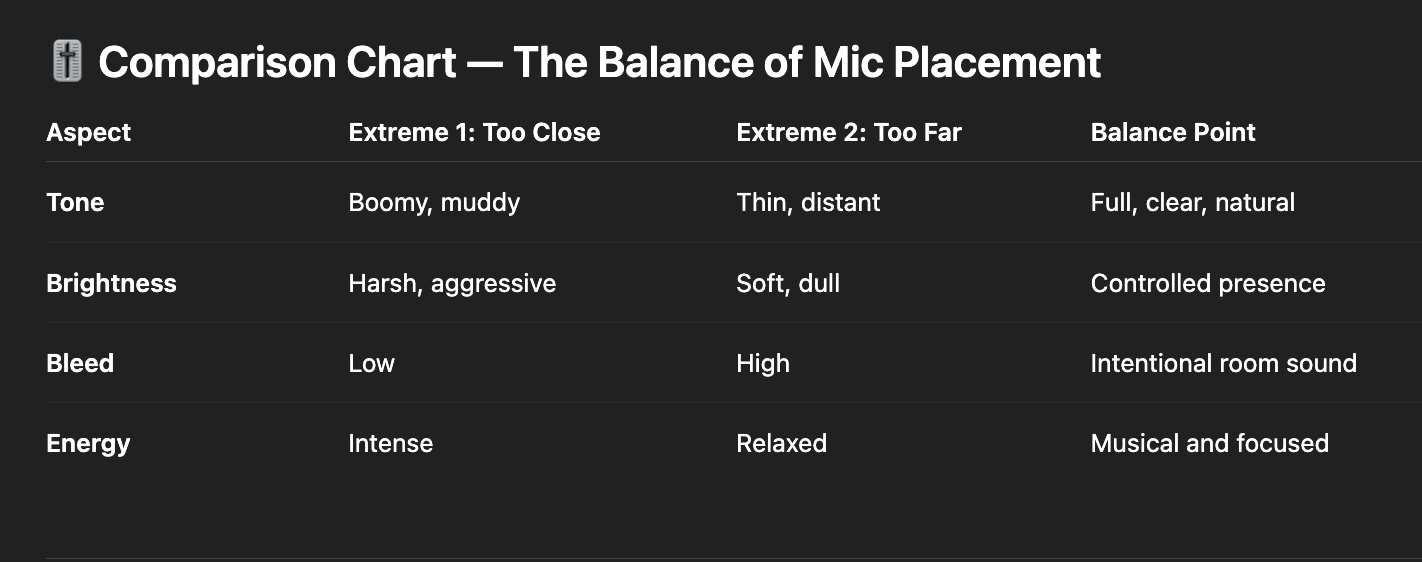
Move it an inch and the tone changes.
Twist it slightly and the brightness shifts.
Pull back and suddenly the recording breathes.
These ten rules are universal — they work on vocals, drums, guitars, amps, percussion, pianos, and anything that makes sound.
They keep things simple, repeatable, and musical.
Quick Summary
👉 Mic placement shapes tone far more than EQ. Small moves, angles, and distance control low end, brightness, clarity, bleed, and overall energy. These ten rules help you capture the sound you want before you ever touch a plugin.
 ⭐️ Start by downloading all of my FREE Music Production Guides ⭐️ It took me years to learn this stuff!
🎚️ The 10 Universal Rules (Explained Simply)
1. Closer = More Low-Mids
The closer the mic is, the more warmth, body, and low-mid punch you get.
Pull back to remove mud or boominess.
2. Angle Controls Brightness
Point the mic directly at the source for more highs and presence.
Angle it off-axis to soften harshness.
3. Center = Attack. Edge = Warmth.
Especially true on drums, amps, and speakers:
-
Center = brighter, more attack
-
Edge = rounder, fuller, less harsh
4. Small Moves Matter
One inch can change everything.
If the tone feels off, move the mic before you change settings.
5. Use Your Ear as the First Mic
Put your ear where you think the mic should go (safely).
If it sounds right there, that’s your starting point.
6. Avoid Pointing at Bleed
Use mic direction and “nulls” to reject noise:
aim the dead side of the mic at hi-hats, cymbals, amps, or room sound you don’t want.
7. Start Neutral
Begin with a mid-distance, slight angle.
This gives you a balanced tone you can adjust from.
8. Use Distance for Natural Tone
Pull back a foot or more for openness, space, and realism.
Great for acoustic instruments, vocals, and room mics.
9. Use Proximity for Weight
Move in close when you want thickness, punch, or intensity, like rap vocals or kick drums.
10. Fix Tone With Placement Before EQ
Always move the mic first.
Placement shapes tone more musically than plugins ever can.
Learn to Record: Recording Vocals & Instruments for Beginners
 ⭐️ Download my Free Guide The Magic Compressor Settings that work on EVERYTHING!
🧠 FAQ
Q: Why does distance change the tone so much?
A: Closer placement boosts low-mids (proximity effect), while distance adds room tone and clarity.
Q: What does “off-axis” mean?
A: The mic isn’t pointed directly at the source — this softens brightness and reduces harsh frequencies.
Q: How do I reduce bleed in a small room?
A: Aim the back or sides of the mic at loud distractions like hi-hats or speakers.
Q: Should I EQ while recording?
A: Only if you must. Mic placement is always the first and best tone shaper.
What Is Latency? My Voice Sounds Delayed When I'm Recording
🔑 Why This Matters
Microphone placement is the fastest way to improve your recordings — no new plugins, no expensive gear, no technical complexity.
Just listening. Adjusting. Moving with intention.
It’s the practice behind every great engineer:
capture the right tone at the source, and everything else becomes easier.

⭐️ Download my Free Magic Delay settings Guide ⭐️

⭐️ Download my Free Magic Reverb settings Guide ⭐️
#protools #daw #homestudio #recordingschool #recording #musicproduction
Also read:
How to Start Your Own Online Business Teaching Music
![]()
Hey, I'm Futch - Music Production Coach and Ableton Certified Trainer

Learn how to make your first song and beat in Ableton Live with my
FREE 90-minute Ableton Live course
I've been teaching audio engineering and music production for 35 years.⭐️
Check out my new online music production program: Music Production Ninja...


