
The Complete Guide to Vocal Processing 🎤
Building the Perfect Vocal Chain
“Less is more.”
— Ludwig Mies van der Rohe
A great vocal doesn't happen because of one plugin.
It happens because several small improvements work together.
Think of vocal processing like getting ready for an important event.
You might:
- Get a haircut.
- Put on nice clothes.
- Polish your shoes.
- Adjust your posture.
None of those things completely transforms you on its own.
Together...
They make a huge difference.
Professional vocal production works the same way.
What Is Vocal Production? – The Magic Key to All Pop Songs
Quick Summary
👉 Professional vocal processing usually follows a chain that includes EQ, dynamics processing (compression, limiting, de-essing, expansion), saturation, parallel effects like delay and reverb, and creative effects such as Auto-Tune or vocoders. Not every vocal needs every processor, but each one solves a different problem.
🎛️ The Goal of Vocal Processing
Before adding plugins...
Ask yourself one question:
"What does this vocal need?"
Maybe it needs:
- More clarity
- Better dynamics
- More warmth
- More space
- More excitement
Plugins are tools.
Not goals.
The best vocal chain solves problems instead of collecting plugins.
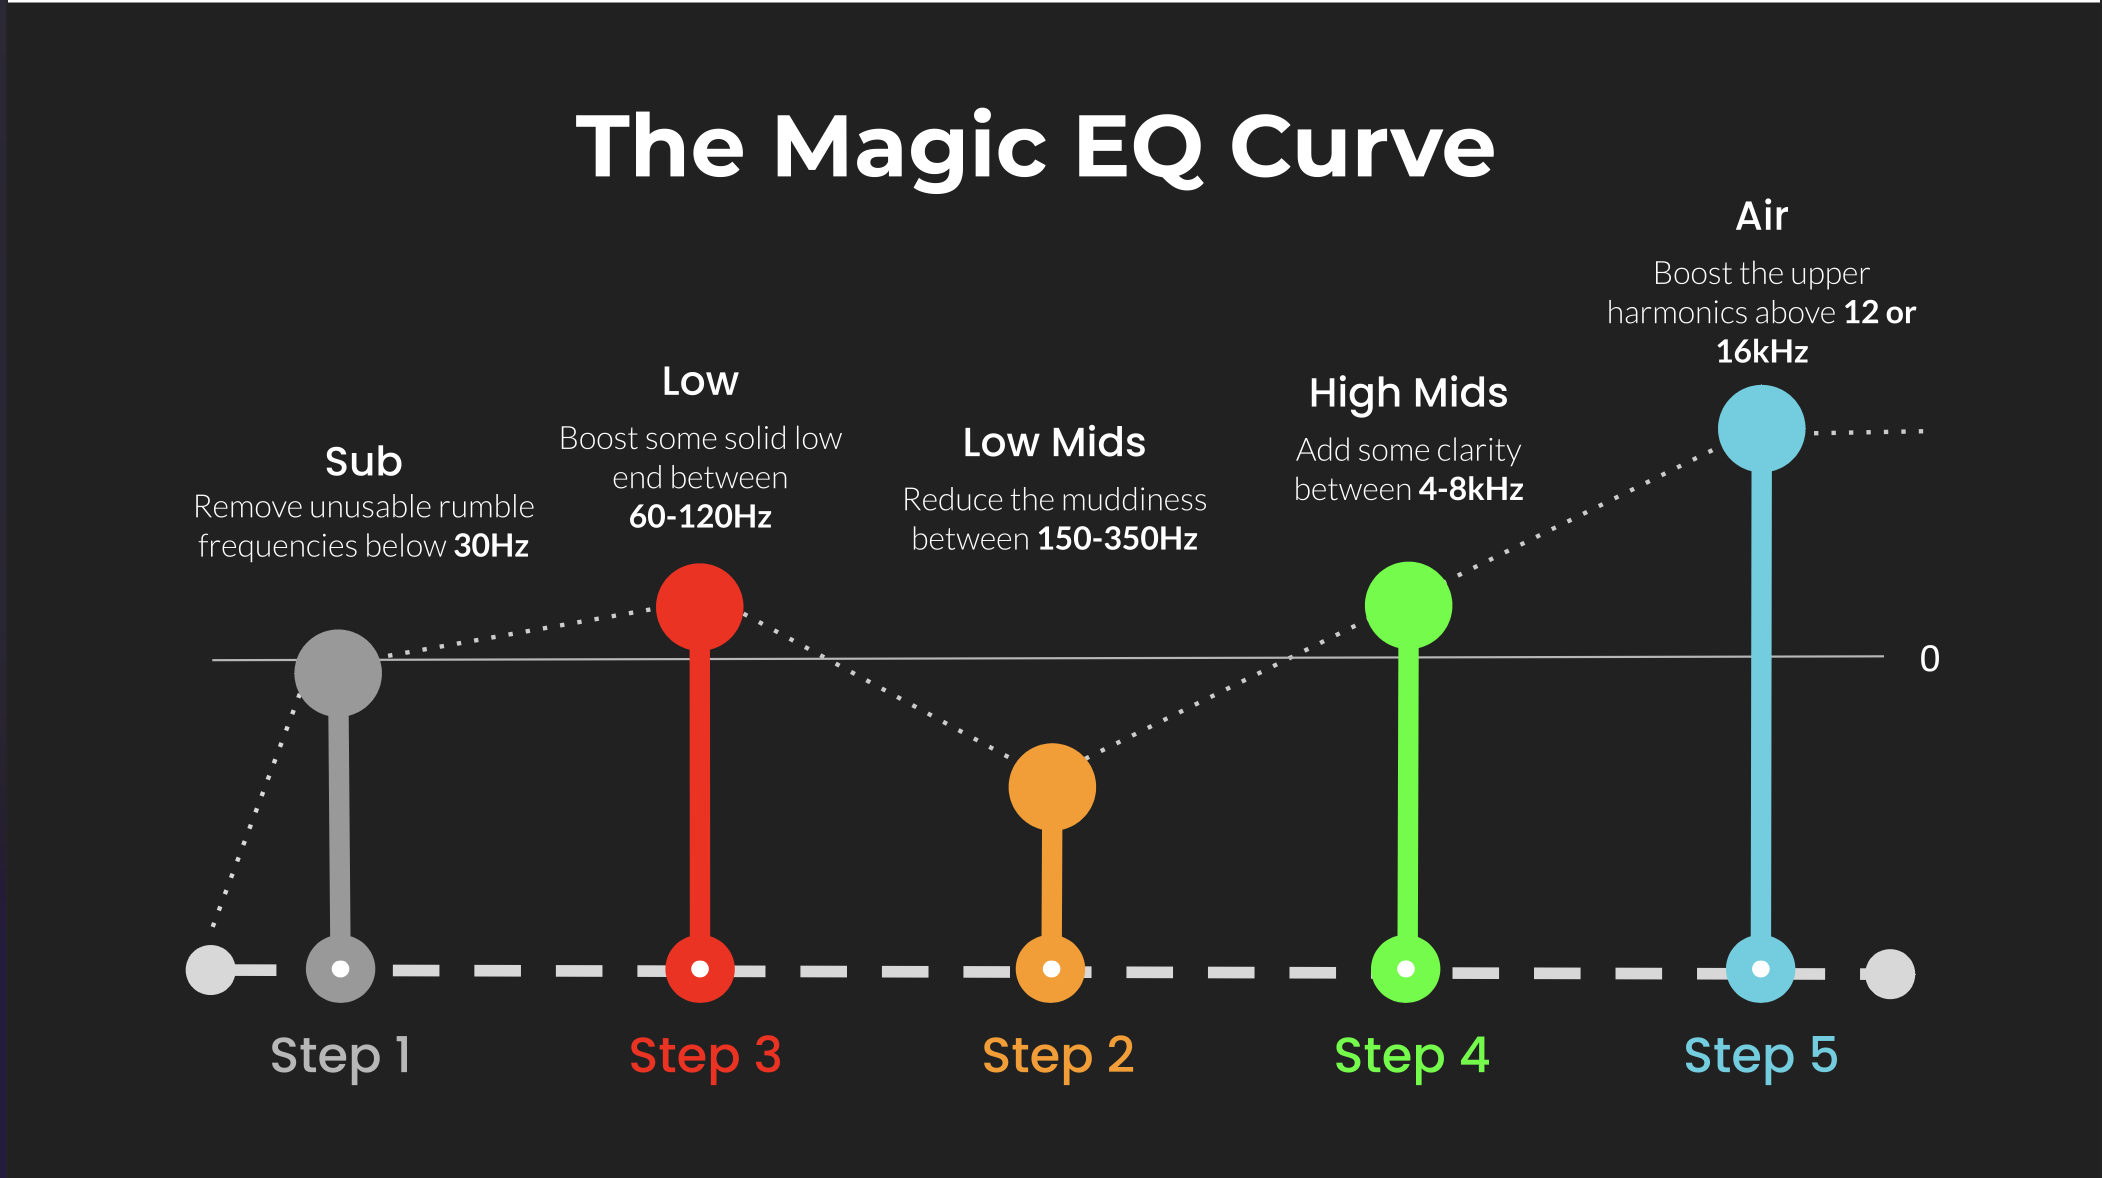
🎚️ Step 1: EQ
EQ shapes the tone of the vocal.
Think of it like adjusting the lighting in a photograph.
You're not changing the subject.
You're changing how clearly you see it.
The Magic EQ Settings that work on Everything!
High-Pass Filter (HPF)
One of the first EQ moves is often a High-Pass Filter.
It removes unwanted low frequencies.
Typically:
- Microphone rumble
- Footsteps
- Air conditioning
- Plosives
- Handling noise
Many engineers begin somewhere around:
70–100 Hz
The exact frequency depends on:
- Singer
- Microphone
- Song
- Genre
Subtractive EQ
Instead of boosting everything...
Try removing problems.
Common areas:
- 200–350 Hz → muddiness
- 500–800 Hz → boxiness
- 2–5 kHz → harshness
Small cuts often sound more natural than large boosts.
Additive EQ
Once the vocal is clean...
You can gently add:
- Air
- Presence
- Brightness
Common areas:
- 5–8 kHz → clarity
- 10–15 kHz → air
Remove the problems before adding the sparkle.
🎚️ Step 2: Dynamics
A singer naturally gets louder and quieter.
Dynamics processors help control those changes.
Compressor
Compressors reduce the difference between loud and quiet parts.
Benefits include:
- Consistent volume
- Better intelligibility
- More controlled performances
A common starting point:
- Ratio: 2:1 or 3:1
- Gain Reduction: 3–6 dB
Limiter
Think of a limiter as a compressor with an extremely high ratio.
It catches the loudest peaks.
Many engineers place a limiter after the compressor for gentle peak control.
Instead of asking one compressor to do everything...
You let two processors share the work.
Compressor vs Limiter: What's The Difference?
Expander
Expanders do the opposite of compressors.
They reduce quiet background noise between phrases.
Useful for:
- Home studios
- Podcasting
- Noisy recordings
They're usually more natural than a hard noise gate.
Noise-Gate vs Expander: What's the Difference?
De-Esser
A de-esser targets harsh "S" sounds.
Common frequencies:
- 5–8 kHz
Without one, vocals can become:
- Sharp
- Painful
- Fatiguing
Especially after adding brightness with EQ.
Compression controls loudness.
A de-esser controls sharpness.
🔥 Step 3: Saturation
Saturation adds harmonics.
Instead of making the vocal louder...
It makes it richer.
Common types include:
- Tape saturation
- Tube saturation
- Console saturation
Benefits:
- Warmth
- Thickness
- Presence
- Character
A little goes a long way.
Saturation adds color without changing the performance.
🌊 Step 4: Parallel Delay
Instead of placing delay directly on the vocal...
Most engineers use a send.
This lets you blend the dry vocal with the delayed signal.
Double Delay
Very short.
Creates the illusion of another singer.
Perfect for:
- Pop
- Rock
- Hip-Hop
Slap Delay
Usually around:
80–150 ms
Classic on:
- Elvis Presley
- Rockabilly
- Country
- Dub
Adds thickness without sounding like an obvious echo.
Medium Delay
Around:
200–400 ms
Adds rhythm and movement.
Common in:
- Pop
- Rock
- Indie
Long Delay
Long repeats that become part of the arrangement.
Perfect for:
- Ambient music
- Dub
- EDM
- Ballads
The Magic Delay Settings that work on Everything!
Delay creates depth through repetition.
 ⭐️ Download my Free Music Production Guides or take my free Ableton Live Course ⭐️
🏛️ Step 5: Parallel Reverb
Reverb places the vocal inside a space.
Again, it's usually best used on a send rather than directly on the vocal.
Chamber
Smooth and dense.
Excellent for vocals.
A classic choice for Pop.
Room
Small and natural.
Makes the vocal feel like it was recorded in a real space.
Hall
Large and lush.
Great for:
- Ballads
- Choirs
- Cinematic vocals
Space
Huge, atmospheric reverbs.
Perfect for:
- Ambient music
- Dream Pop
- Shoegaze
- Dub Techno
The Magic Reverb Settings that work on Everything!
Reverb creates depth through space.
🎛️ Delay vs Reverb
Many beginners use too much reverb.
Sometimes delay is the better choice.
Delay repeats the vocal.
Reverb surrounds the vocal.
Delay usually keeps lyrics clearer.
Reverb often creates a greater sense of distance.
Professional mixes frequently combine both.
🤖 Auto-Tune
Auto-Tune began as a correction tool.
Today it's also an artistic effect.
Uses include:
- Transparent pitch correction
- Modern Pop vocals
- Trap
- Hip-Hop
- R&B
Sometimes you don't hear it.
Sometimes it's the entire sound.
Auto-Tune Alternatives for Pitch Correction or the Auto-Tune Effect 🎤
🤖 Vocoder
A vocoder is very different from Auto-Tune.
Instead of correcting pitch...
It combines the characteristics of a voice with another sound source, usually a synthesizer.
The result is the classic "robot voice."
Famous examples include:
- Daft Punk
- Kraftwerk
- Electric Light Orchestra
Vocoders are creative effects rather than corrective tools.
Auto-Tune changes pitch.
A vocoder changes identity.
🎼 A Typical Vocal Chain
Every vocal is different.
But a common chain might look like this:
Microphone
↓
High-Pass Filter
↓
EQ
↓
Compressor
↓
De-Esser
↓
Limiter
↓
Saturation
↓
Delay Sends
↓
Reverb Sends
↓
Auto-Tune (if desired)
There isn't one perfect order.
But this is a solid place to start.
DIY Vocal Production: How to Make Your Voice Sound Amazing at Home
🎵 Less Is Usually More
The biggest beginner mistake?
Using too much of everything.
Too much:
- EQ
- Compression
- Reverb
- Delay
- Saturation
Professional vocals often sound effortless because every processor is working gently.
Ten plugins doing a little usually sound better than one plugin doing everything.
🧠 A Simple Memory Trick
Think of vocal processing like getting dressed.
EQ
= Clean clothes.
Compression
= Good posture.
Saturation
= A healthy tan.
Delay
= Your shadow.
Reverb
= The room you're standing in.
Auto-Tune
= Touching up the photo.
Vocoder
= Wearing a costume.
Dynamic Vocals: 9 Techniques to Bring Your Voice to Life in Any Mix
🧠 FAQ
Q: What is the first plugin in a vocal chain?
A: Often a High-Pass Filter and EQ to clean up unwanted frequencies.
Q: Do all vocals need compression?
A: Most modern recordings benefit from some compression, but the amount depends on the performance.
Q: Should delay and reverb be inserts or sends?
A: They're usually used as parallel effects on auxiliary sends.
Q: What's the difference between Auto-Tune and a vocoder?
A: Auto-Tune corrects pitch. A vocoder combines a voice with another sound source to create a synthetic vocal effect.
Q: What's the biggest mistake beginners make?
A: Over-processing. Too much EQ, compression, saturation, delay, or reverb can quickly make a vocal sound unnatural.
🔑 Final Thought
Great vocal processing isn't about hiding the singer.
It's about helping the performance connect with the listener.
Every processor has a job.
EQ creates clarity.
Dynamics create consistency.
Saturation adds character.
Delay creates depth.
Reverb creates space.
Auto-Tune corrects or stylizes.
Vocoders transform.
The microphone captures the performance.
Vocal processing shapes the experience.
And the best vocal chain is rarely the one with the most plugins.
It's the one where every plugin has a purpose.
 ⭐️ Download my Free Magic EQ settings Guide ⭐️

⭐️ Download my Free Magic Reverb settings Guide ⭐️
#protools #daw #homestudio #recordingschool #recording #musicproduction
Also read:
How to Start Your Own Online Business Teaching Music
![]()
Hey, I'm Futch - Music Production Coach and Ableton Certified Trainer

Learn how to make your first song and beat in Ableton Live with my
FREE 90-minute Ableton Live course
I've been teaching audio engineering and music production for 35 years.⭐️
Check out my new online music production program: Music Production Ninja...


