
Recording Techniques: 10 Steps to Layering Guitars 🎸

The Secret to Huge Guitar Sounds
Layered guitars are the backbone of rock, pop, metal, indie, and cinematic production.
But big guitar tones don’t just “happen.” They come from a repeatable, organized workflow that keeps everything tight, in tune, and mix-ready.
This 10-step process is a standard studio method used in professional sessions — simple enough for beginners, detailed enough for engineers.
Quick Summary
👉 Layering guitars involves capturing a clean DI signal, recording bed tracks, choosing or overdubbing a main take, tuning, editing, doubling, organizing panning, adding more layers with different tones, and overdubbing harmonies to build a full, balanced wall of sound.
🎚️ 1. Set Up: Record Amp + DI for Flexibility
Start by recording:
-
your main amp or virtual amp tone
-
a clean DI track via a DI box
Why the DI matters:
-
you can re-amp later
-
you get clean transients for editing
-
you stay flexible if tone decisions change
This dual-track setup is standard in every modern studio.
Recording: What Is a DI Box and When Do I Need One? 🎛️
🎚️ 2. Bed Tracks: Capture the Live Performance
Before overdubs, record the full band or scratch version:
-
drums
-
bass
-
guitars
-
keys
-
guide vocals
This creates the “map” of the song.
Even if you replace everything later, the bed tracks give you timing, arrangement, and feel.
10 Universal Rules for Recording Anything with a Microphone 🎤
🎚️ 3. Choose the Main Take: Keep or Overdub
Listen back to the bed tracks.
If the original guitar performance feels strong, use it as the main take.
If not, overdub a new one.
The goal is to establish one definitive performance that represents the part.
🎚️ 4. Overdub & Comp: Build a Master Take
If you re-record the part:
-
track multiple takes
-
punch in problem spots
-
comp the best moments together
This comp becomes your master reference guitar — the version everything else must match.
🎚️ 5. Tuning: Make Every Chord and Note Perfect
Great guitar layers start with perfect pitch.
Two approaches:
Micro-tuning punch-ins
Punch in chords or notes that sound sharp or flat.
Full-performance tuning and timing
Go phrase-by-phrase with a tuner for maximum accuracy.
Small fixes now prevent pitch issues later.
 ⭐️ Start by downloading all of my FREE Music Production Guides ⭐️ It took me years to learn this stuff!
🎚️ 6. Edit the Master Comp
Once the performance is final:
-
tighten the timing of a few notes, or even edit the whole track to the song's tempo grid
-
add crossfades to punch-ins
-
fade the ending
-
consolidate to a clean audio file
-
rename it clearly
This becomes your reference track for all doubling and layering.
Editing Audio is Just like Editing a Text Document
🎚️ 7. Double the Master Take
Now record the same guitar part again — as close as humanly possible.
Doubling gives guitars their width, density, and cinematic feel.
You can:
-
attempt it in one full take
-
or punch in section by section
The goal: perfectly mimic the timing and feel of the master take.
🎚️ 8. Monitoring: Pan & Balance While Recording
You now have two takes:
-
Take A (master)
-
Take B (double)
Monitoring Options
-
Hard L/R for maximum width
-
Tighter panning for a focused center
-
Use a 6dB volume drop on the track you're not playing so you can hear your performance clearly
Monitoring correctly helps you match feel, timing, and tone.
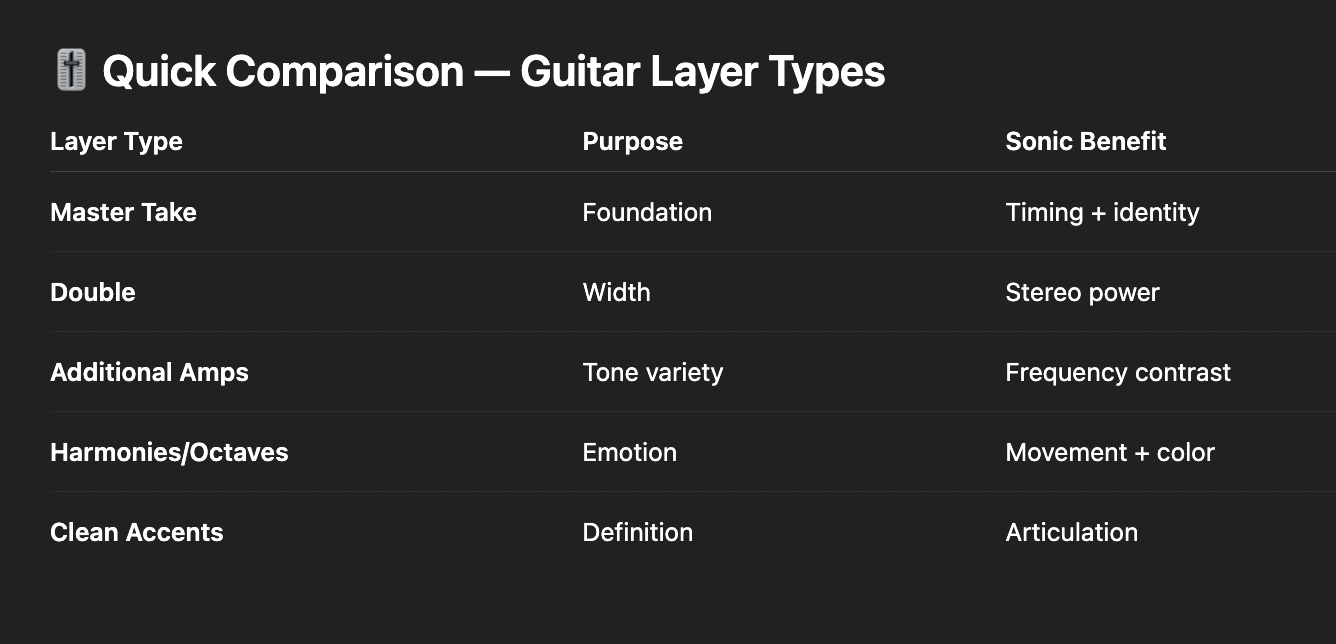
🎚️ 9. Add More Layers: Different Amps & Tones
Once doubles are done, expand the palette.
Try layering:
-
Marshall (crunch, roar)
-
Fender (clean, sparkle)
-
Mesa Boogie (tight, heavy)
-
Fuzz for texture
-
Clean picking for clarity
-
Stereo pairs for movement
Think of it like EQ with amps — each layer fills a different frequency space.
🎚️ 10. Add Harmonies, Octaves & Creative Layers
Finally, shape the emotional arc of the guitars:
-
octave-up lines
-
octave-down lines
-
fifth harmonies
-
counter-melodies
-
rhythmic accents
For each new layer:
-
change the amp or pedal
-
adjust distortion levels
-
experiment with panning
-
adjust volumes to avoid frequency buildup
This step transforms rhythm guitars into a finished, expressive guitar arrangement.
🧠 FAQ
Q: Why record both amp and DI?
A: The DI allows re-amping, clean editing, and long-term tone flexibility.
Q: How many layers are too many?
A: When clarity disappears. Use different tones to avoid stacking the same frequencies.
Q: Is doubling required?
A: For wide guitars, yes. One take per side is the standard.
Q: How do I keep layers tight?
A: Tune each pass, follow the master comp, and record in small sections if necessary.
 ⭐️ Download my Free Guide The Magic Compressor Settings that work on EVERYTHING!
🔑 Why This Matters
Layered guitars aren’t about “more tracks.”
They’re about clarity, intention, and organization.
This 10-step method gives you:
-
cleaner tone
-
tighter timing
-
consistent tuning
-
flexible arranging
-
professional mixing options
Great guitar production is built, not guessed.
Follow the structure — then experiment with tone, space, and emotion.

⭐️ Download my Free Magic Delay settings Guide ⭐️

⭐️ Download my Free Magic Reverb settings Guide ⭐️
#protools #daw #homestudio #recordingschool #recording #musicproduction
Also read:
How to Start Your Own Online Business Teaching Music
![]()
Hey, I'm Futch - Music Production Coach and Ableton Certified Trainer

Learn how to make your first song and beat in Ableton Live with my
FREE 90-minute Ableton Live course
I've been teaching audio engineering and music production for 35 years.⭐️
Check out my new online music production program: Music Production Ninja...


