
The Best Equalizer Settings: The 5 Step Magic EQ Settings that work on Everything!

Do you want to learn how to EQ music? Do you want your vocal and music tracks to sound loud and clear? Are you ready? In this blog post I’ll show you the best equalizer settings - a magic EQ curve that took me 25 years to refine, simplify, and put into words. These equalizer settings work on everything: vocals, kick drums, stereo beats, synths, guitars, and percussion. It even works on the whole mix. Once you memorize these 5 basic equalizer steps you can customize and adjust these settings to maximize your sound. Some people say that a magic EQ curve that works on everything is impossible. Try it for yourself and see. These settings give you a starting point for success and even though I stand by these settings as they are, the real power is when you can adapt them to match your own needs. Try the following 5-tep EQ settings in any DAW or with any hardware EQ.
Note: The better your source sounds are, the less you will need to use any EQ at all.
Learn these 5 EQ rules and then learn how to break them.
⭐️ Download the Free PDF version of this guide here ⭐️
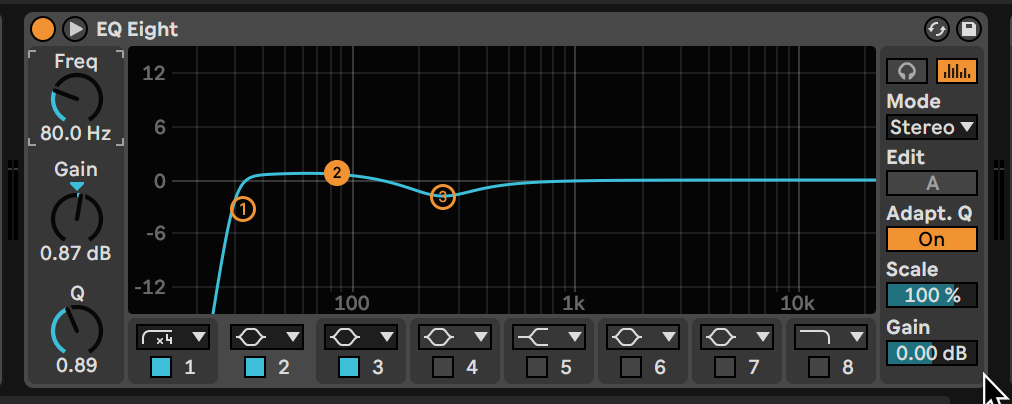
Step 1: HPF at 30HZ
Most instruments don’t make any usable sound below about 60-80Hz. The exceptions are: 808s, Bass (synth or guitar) and kick drums. There are other exceptions but usually you can roll off all of the unnecessary excess sub frequencies. They make vocals, guitars and mixes excessively rumbly and boomy.
I recommend using a HPF (High Pass Filter) with a 24dB/Octave slope set to remove all frequencies below:
- 30Hz on the master fader
- 100Hz on a vocal
- 80Hz on a guitar
- 150Hz (or higher) on hi-hats and cymbals
- 80Hz on a snare drum
- 30Hz on bass Instruments or kick drum

This is what it looks like in Ableton Live but you can use these 5 magic EQ steps on any software or hardware EQ.
Step 2: Reduce Some Mud at 250Hz
Muddy frequencies reduce the clarity of vocals and instruments. Cup both hands over your mouth and nose and then say a few test words to simulate what a muddy frequency build-up can sound like on a voice. I find that the muddy sound is usually located somewhere in the 150Hz to 350Hz zone. Use a bell curve EQ band with a 1-octave Q or bandwidth setting to boost frequencies in that zone, sweep around to find the worst muddy frequency and then reduce that frequency by -3 to -6dB. Sometimes I’ll reduce even more.
I recommend using a bell curve (1-octave Q) starting with these settings:
- -3dB at 300Hz on a vocal
- -3dB at 250Hz on the master fader
- -7dB at 300Hz on a live kick drum recording
- -3dB at 300Hz on a kick drum sample
- -3dB at 350Hz on a synth bass

⭐️ Download my FREE guide: The Magic EQ Settings ⭐️
Step 3: Boost Some Bass at 80Hz
Now that you’ve reduced some unnecessary sub frequencies and excess muddiness, you will need to reinforce the low end with some solid, clear bottom end. In between the sub and the mud you will find some clean frequencies around 60-150Hz. Sweep around to find the one that sounds the best and boost it just a bit. This should instantly bring back the loss of power from the mud reduction but with a much more powerful and punchy low end.
I recommend using a bell curve (1-octave Q) starting with these settings:
- +3dB at 120Hz on a vocal (adjust in tandem with the 100Hz HPF)
- +3dB at 80Hz on the master fader
- +3dB at 60Hz on a kick drum
- +3dB at 100Hz on a snare drum
Step 4: Boost Some Presence at 5kHz
This move is totally optional. If you find that even after removing the mud, you still need some clarity on your track you can boost a bit of presence or “slap”, “attack” or “point” somewhere in the high mid frequencies between 3kHz to about 6kHz. If your track is already quite present and close sounding this step might not be necessary.
I recommend using a bell curve (1-octave Q) starting with these settings:
- +3dB at 3kHz for a bass guitar
- +3dB at 4kHz for a kick drum
- +3dB at 5kHz for a snare drum
- +3dB at 6kHz for a vocal

Step 5: Boost Some Air at 16kHz
This is my favorite EQ move of all time. Let’s boost some air! This is not a regular treble boost. It’s usually from 8kHz to 20kHz. Rub your index finger and thumbs briskly and put them next to your ears. That’s the closest way I can get you to think about air. It gives your tracks a harmonic boost that makes them sound expensive and expansive and adds dimension to your recordings.
I recommend using a high frequency shelf starting with these settings:
- +8dB at 16kHz on the master fader
- +3dB at 12kHz on the lead vocal
- +6dB at 8kHz on the kick drum

Conclusion
Don’t forget to hit the Bypass button on your EQ and adjust your output so the levels are about the same with the EQ on and off. Then compare the two and adjust the EQ settings to best suit your song's needs. The end result should look roughly like a checkmark, the Nike Swoosh or the story arc of the main character in most movies that starts out somewhere in the middle, faces some adversity and ends up in a better place at the end of the movie.

⭐️ Download the Free PDF version of this guide here ⭐️
![]()
Futch - Music Production Coach, Ableton Certified Trainer
Also read: Best Equalizer Settings for Vocals, Instruments & Mixes
For more moves download my FREE Music Production Magic guide featuring 50 key music production moves that will make your songs and mixes sound better instantly.

Make Better Music!


